.NET Web API Deployment in Azure (GitLab CI/CD Pipeline, Webhooks and Runners)
Hello, everyone) My name is Khasan Rashidov. I am a .NET Engineer. I will show you how to set up a CI/CD pipeline in GitLab for proper deployment of the ASP.NET Core Web API in Azure. Basically, I am writing this blog post because I could not find a normal article or YouTube video on the internet, let alone the GitLab documentation seems very poor (IMO, indeed, it is) for a starting software engineer (developer or DevOps, for everyone :).

By this time, I was having an internship in a company as a .NET Engineer, and I was given many tasks, one of which was to set up a CI/CD pipeline in GitLab (where our project is stored) for our project. It was basically a .NET Web API project. It was the first time for me to set up a GitLab CI/CD pipeline (in the past, I had experience with GitHub Actions, where I set up CI for build and test steps (with nice test reports with parsers) for my own projects, and it was way easier than GitLab ones). But of course, we need to understand that the most significant difference between the two is that while GitHub is a collaboration platform that helps review and manage codes remotely, GitLab is primarily focused on DevOps and CI/CD.
So...
Step Zero: To begin with, you need to have the Settings bar for your GitLab project. Basically, the one who sets up the project repository has access to it.
 |
| e.g. I don't have Settings bar. You can notice more options here because it is company's GitLab (other GitLab instance). |
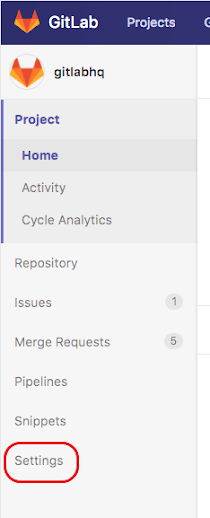 |
| You should have Settings bar. |
Main Steps:
1. Create a Resource in Azure for your Web API (Web App) with necessary configurations.
2. This step is about Deploying an application from GitLab (the repository) to Azure App Service; it is basically the setup of Auto-Deployment using a Webhook. Since in my case Webhook was configured by another developer, I will just provide a link to the blog of Royce Beryl M. Laput (.NET developer), which shows it very nicely with steps.
Resource: https://rlaput.github.io/Azure-GitLab-Autodeploy/
3. Configuring the .gitlab-ci.yml file for CI.
You need to install dotnet-reportgenerator-globaltool for reports of your unit tests and integration tests. You will have the following structure:
Project folder -> .config folder -> dotnet-tools.json file:
 |
| Example from our Project |
We need the dotnet-tools.json file because in our .gitlab-ci.yml file we have 'dotnet tool restore' step from which we will restore the reportgenerator.
The following working .gitlab-ci.yml file we have for CI:
* For the above .gitlab-ci.yml file all command should be in one line (you can use GitLab CI/CD Validator e.g. in VS Code to check if your .yml file is correct).
* Instead of shared_runner_tag in the above .yml file I use tag1 (shared tag)(later you will notice that our company has two shared runners for our project with some tags)
So, about tags: Tags are for the GitLab runner that you use to build, test, and deploy your projects. GitLab Runner is a very cool thing that you can set up on your local machine for yourself (which is not a good option for us; we don't need it, which is basically why I am writing this article), or configure it on some server so that the whole team can use it. The documentation for setting up and using GitLab Runner locally is available on the net (or other runners such as Shared Runners or SaaS runners); it is well explained there.

The shared runners are basically the runners that are for the whole team, possibly by your company for developers in the company's GitLab instance. We had our company's runners, so I used them.
So, for CI we configured the .gitlab-ci.yml file which builds and tests (using our unit tests and integration tests) using our company's shared runners.
4. Now that we have everything set up, how are we going to automate it? We have a webhook that can deploy the Web API, and we have written the unit tests and integration tests for our project, which will be built and tested on the server (because of shared runners). So, to accomplish auto-deployment (the CD step), we will enter Settings in GitLab for the project repository, and then we will enter Webhook Settings and configure trigger events so that our GitLab should trigger our webhook for pushing to master. Why the master branch? (Here starts a very great technique for CD.) Well, typically we don't commit directly to master; we create merge requests from other development or feature branches targeting the master branch. When we merge the merge request, it will be a push or commit to master, which in turn triggers our webhook from Azure to deploy.
So, go to Settings -> Webhook -> configure trigger for push master events.
5. So, we configured the trigger for pushing to the master branch (which will happen after approval of the merge request). However, we are not fully configured for the CI to CD step; I mean, we can still merge the merge request with failed tests and an unsuccessful pipeline (which is really bad). The last step would be to ensure that we cannot merge the merge request without a successful pipeline, so it should require a successful pipeline for merging. We can easily configure it in the Settings for our project. You can follow the link : Auto-merge | GitLab
 |
| From GitLab documentation. |
So, when your build and test jobs are successful, you can merge the merge request.
 |
| Successful build and test (for CI) |
That was it. We configured the CI/CD step. CD works in the following way: we don't commit directly to the master branch; instead, we create a merge request targeting the master branch, and if your build and test steps are successful (i.e., pipeline passed), then we can merge the merge request, which would mean a push to master, and after that, it would trigger our webhook, which would deploy to Azure.
Thank you for reading, I hope this article was helpful for you.))
Any questions just leave them in the comments.))
Author: Khasan Rashidov, Software Engineer


Comments
Post a Comment